
Turn Your Ideas Into Prints: Learn T-Shirt Printing Step by Step


Every printed T-shirt begins long before ink touches fabric. It might start as a sketch in the corner of a notebook, a logo for a small business, artwork for a school event, or simply an idea someone wants to wear.
Turning that idea into a clean, durable print takes more than placing a design on a shirt and hoping for the best. Screen printing involves a series of connected steps, and understanding what happens at each stage can make the learning process much easier.
For beginners, students, educators, and anyone interested in learning screen printing, the best place to begin is with the fundamentals.
Step 1: Start With an Idea That Works on Fabric
A great T-shirt design does not need to be complicated.
In fact, simple artwork can often produce some of the strongest prints. Bold lettering, clear shapes, logos, illustrations, and limited-color designs are excellent starting points for beginners.
Before preparing anything for printing, think about how the design will look on an actual shirt. Consider its size, placement, colors, and level of detail.
A design that looks impressive on a computer screen may need adjustments before it becomes suitable for screen printing. Very thin lines, tiny text, or excessive detail can make the printing process more challenging, especially when you are still learning.
Starting simple gives you room to understand the process without fighting the artwork.
Step 2: Prepare Your Artwork for Printing
Once you have chosen a design, the next step is preparing the artwork.
Screen printing works differently from an ordinary home printer. Each ink color in a design generally requires its own screen. A one-color design is therefore much easier for a beginner than artwork containing several colors.
Clean, high-contrast artwork usually works best.
If you are learning how to screen print shirts, begin with a simple black design that can be transferred clearly onto a transparency or film positive. The dark areas of the artwork play an important role when the screen is exposed to light.
This stage is worth getting right. Good artwork preparation can prevent many problems later.
Step 3: Understand What the Screen Actually Does
The screen is one of the most important parts of the process.
It consists of mesh stretched tightly across a frame. Rather than thinking of it as something that simply holds ink, think of it as a carefully prepared stencil.
The mesh is coated with photo emulsion, a light-sensitive material used to create the printable image. After the coating dries in a controlled environment, the prepared artwork is positioned on the screen and exposed to the appropriate light source.
The exposure process hardens certain areas of the emulsion while leaving the image area ready to be washed out.
Once washed correctly, the open portion of the mesh forms the stencil through which ink will eventually pass.
This is where patience matters. Uneven coating, incorrect exposure, dust, or rushed drying can affect the final stencil.
Step 4: Set Up Before Opening the Ink
One of the easiest beginner mistakes is getting excited about printing and opening the ink too early.
First, organize the workspace.
Position the shirt properly, secure the screen, gather the correct squeegee, prepare the ink, and make sure everything is aligned. If several shirts will be printed, consistent placement becomes especially important.
A proper screen printing setup for beginners does not have to be overly complicated. What matters most is creating a repeatable process.
Take time to check where the artwork will sit on the garment. A design that is slightly off-center or positioned too high can make an otherwise good print look unprofessional.
Preparation saves both shirts and ink.
Step 5: Learn How Ink Moves Through the Screen
Now comes the moment when the design finally begins moving from an idea to something physical.
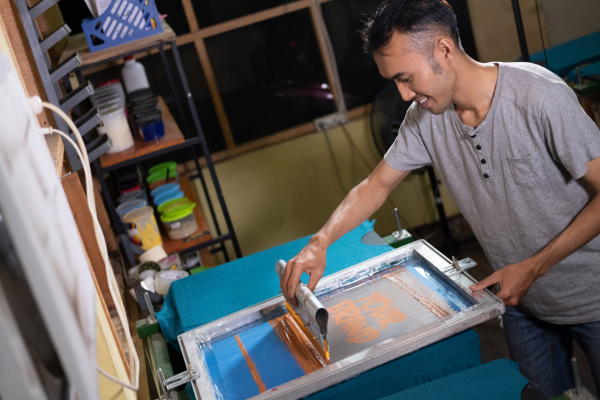
Ink is placed on the screen and moved across the stencil using a squeegee. The angle, pressure, speed, and consistency of the stroke all influence the result.
Too little pressure may leave an incomplete print. Too much pressure can create other problems, including excessive ink deposit or blurred details.
Do not expect perfect results immediately.
Practice on test fabric before using your best shirts. Pay attention to what changes when you adjust pressure or technique. Screen printing is a hands-on skill, and small experiments can teach you more than repeatedly making the same mistake.
Step 6: Cure the Ink Properly
A print may look finished when the shirt comes off the press, but the work is not complete yet.
The ink must be cured correctly.
Curing helps the print withstand normal wear and washing. The required curing method depends on the type of ink being used, so always follow the ink manufacturer’s specifications for temperature, time, and equipment.
Guessing at this stage can lead to prints that crack, fade, or wash away prematurely.
For anyone learning DIY T-shirt printing, understanding curing is just as important as learning how to pull a squeegee.
Step 7: Inspect the Print and Learn From It
After curing, examine the finished shirt carefully.
Are the edges clean? Is the ink coverage even? Is the design positioned correctly? Did small details print clearly?
Do not look at mistakes simply as wasted attempts. A poor print can reveal exactly which part of the process needs improvement.
Maybe the artwork contained too much detail. Perhaps the screen exposure needs adjustment. The squeegee pressure may have been inconsistent, or the shirt may have shifted during printing.
Identifying the cause helps make the next print better.
Learning Screen Printing in an Educational Setting
Screen printing can also be a valuable practical subject for schools, colleges, workshops, art departments, and vocational learning environments.
A structured educational program can introduce students to design preparation, color, screen setup, printing techniques, problem-solving, and production skills through hands-on projects.
Educators building a classroom printing setup should also consider the cost of screens, inks, emulsions, cleaning products, tools, and other supplies. Programs and supplier resources designed for educational settings can make it easier to plan purchases while giving students access to appropriate materials.
For example, Screen Print Direct provides screen printing supplies and resources that can support both new and experienced printers exploring the craft.
Your First Print Is Only the Beginning
Learning T-shirt printing is easier when you stop thinking of it as one big task.
Start with an idea. Prepare simple artwork. Learn how the screen works. Set up carefully. Practice your printing technique. Cure according to the product requirements. Then inspect what you created and use that experience to improve the next attempt.
Your first shirt may not look exactly as you imagined—and that is part of learning a hands-on craft.
With practice, those early sketches and ideas can become prints you can actually hold, wear, share, and build upon.

Comments